Dyson DC17: A Comprehensive User & Maintenance Guide (Updated 05/04/2026)
This detailed manual streamlines installation, operation, and maintenance, ensuring peak performance from your Dyson DC17 for a consistently cleaner and healthier home environment․
Welcome to the world of powerful and efficient cleaning with your Dyson DC17! This vacuum cleaner represents a significant advancement in home cleaning technology, designed to capture dirt and allergens effectively․ This guide serves as your comprehensive resource for understanding and maximizing the potential of your new appliance․
The Dyson DC17 isn’t just a vacuum; it’s an investment in a cleaner, healthier living space․ This manual will walk you through every aspect of ownership, from initial setup and operation to routine maintenance and troubleshooting․ We aim to empower you to maintain optimal performance and extend the lifespan of your DC17․
Whether you’re a first-time Dyson owner or familiar with the brand, this guide provides valuable insights into the DC17’s unique features and capabilities․ Prepare to experience a new standard in cleaning performance and convenience!
Key Features and Technologies
The Dyson DC17 boasts several innovative features designed for superior cleaning performance․ At its core lies the patented Root Cyclone™ technology, maintaining powerful suction even as the dustbin fills․ This eliminates the loss of suction common in traditional vacuums, ensuring consistent cleaning power․
Furthermore, the DC17 utilizes a HEPA filter, capturing microscopic dust and allergens – ideal for allergy sufferers․ Its lightweight design and maneuverability make cleaning effortless, reaching difficult areas with ease․ Multiple brush heads cater to diverse floor types and cleaning tasks, from carpets to hard floors․
The DC17’s robust construction ensures durability, while its bagless design simplifies emptying and reduces ongoing costs․ These combined technologies deliver a truly exceptional cleaning experience, making the Dyson DC17 a standout choice for modern homes․
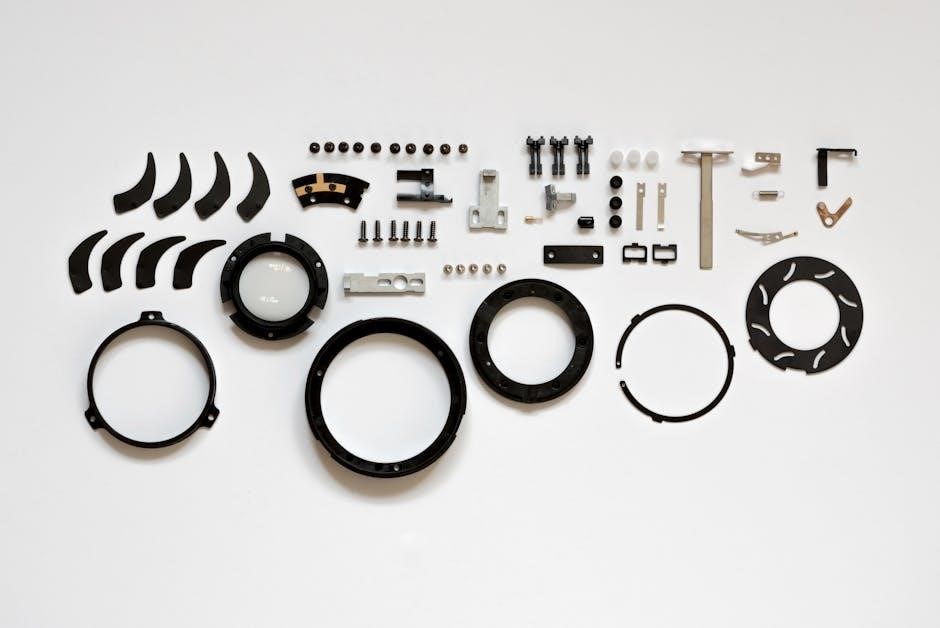
Unboxing and Component Identification
Upon opening your Dyson DC17 packaging, carefully verify all components are present․ You should find the main body of the vacuum, the wand, the hose, a combination tool for versatile cleaning, a crevice tool for reaching tight spaces, and a turbine head designed for upholstery and stairs․
Additionally, locate the dustbin, which is easily removable for emptying․ Inspect the HEPA filter – it may be pre-installed or packaged separately․ A quick-start guide and this comprehensive user manual are also included․ Ensure no parts are damaged during shipping․
Familiarize yourself with each component’s function before assembly․ Refer to the diagrams in this manual for clear identification․ Proper component identification is crucial for correct assembly and optimal performance of your new Dyson DC17 vacuum cleaner․

Setting Up Your Dyson DC17
Effortlessly assemble your Dyson DC17 with our step-by-step instructions, ensuring a secure fit for all components and preparing it for powerful cleaning performance․
Assembling the Dyson DC17
Begin by connecting the wand to the main body of the Dyson DC17, ensuring a firm click to secure it in place․ Next, attach your desired brush head – options include the combination tool, crevice tool, or motorized brush – by aligning and twisting until locked․
The hose connects to the rear of the machine, again with a distinct click․ Double-check all connections to prevent suction loss during operation․ For optimal performance, ensure the dustbin is correctly installed before proceeding․
Refer to the included diagrams for visual guidance․ Incorrect assembly can impact cleaning efficiency and potentially damage components․ A properly assembled DC17 is the foundation for effective and reliable cleaning throughout your home․
Powering On and Initial Use
To power on your Dyson DC17, locate the power button – typically situated on the main body of the machine․ Press firmly to initiate the motor․ Before commencing cleaning, briefly test the suction on a small, inconspicuous area of your flooring to confirm proper operation․
Begin with lower suction settings for delicate surfaces like rugs or curtains, gradually increasing power as needed for hard floors and carpets․ Avoid directing the suction head at loose objects that could be drawn into the machine․
Familiarize yourself with the machine’s maneuverability and weight distribution during initial use․ A smooth, controlled motion will maximize cleaning effectiveness and minimize strain․
Adjusting Suction Power Settings
The Dyson DC17 offers variable suction power settings, controlled via a dial or button located on the machine’s body․ Lower settings are ideal for delicate fabrics, curtains, and lampshades, minimizing the risk of damage while effectively removing dust․
For carpets and rugs, particularly those with deep piles, utilize the maximum suction setting to agitate fibers and lift embedded dirt and debris․ Observe the floor head; if it feels difficult to push, reduce the suction level slightly․
Experiment with different settings to find the optimal balance between cleaning power and maneuverability for various surfaces․ Regularly adjusting the suction ensures efficient cleaning and prolongs the motor’s lifespan․
Understanding the Dyson DC17 Components
Explore the core elements – cyclone, filters, brush heads, wand, and hose – that work synergistically to deliver powerful suction and exceptional cleaning performance․
The Cyclone Technology Explained
At the heart of the Dyson DC17 lies its revolutionary cyclone technology, a key differentiator from traditional vacuum cleaners․ Unlike conventional systems that rely on a bag to collect dust, the DC17 utilizes powerful centrifugal forces to spin air and dust at incredibly high speeds – exceeding 500 mph․
This rapid spinning action effectively separates microscopic dust and debris from the airflow, flinging them outwards into the dust bin․ Multiple cyclones working in parallel enhance this separation process, ensuring consistent suction power even as the bin fills․ This innovative design eliminates the loss of suction commonly experienced with bagged vacuums, maintaining optimal cleaning performance throughout your home․
The DC17’s cyclone system is not just about power; it’s about efficiency․ By removing dust from the airflow before it reaches the motor, it protects the motor and prolongs the lifespan of your vacuum cleaner, offering long-lasting reliability․
Filter System: Types and Locations
The Dyson DC17 incorporates a sophisticated two-stage filtration system designed to capture even the finest dust particles and allergens, ensuring cleaner exhaust air․ The first stage utilizes a washable pre-motor filter, typically located behind the dust bin, which protects the motor from larger debris and extends its lifespan․ Regular cleaning of this filter is crucial for maintaining optimal suction․
The second stage features a HEPA (High-Efficiency Particulate Air) filter, positioned within the machine’s body․ This filter traps 99․97% of particles as small as 0․3 microns, including pollen, mold spores, and dust mites․
The HEPA filter requires periodic replacement – typically every year, depending on usage – to maintain its effectiveness․ Accessing and replacing these filters is straightforward, ensuring easy maintenance and continued air purification within your home․
Brush Head Variations & Their Uses
The Dyson DC17 often includes several brush head attachments, each designed for specific cleaning tasks․ The motorized brush head is ideal for carpets and rugs, agitating fibers to loosen embedded dirt and debris, providing a deep clean․ A non-motorized brush head is perfect for hard floors, preventing scratching and effectively removing dust and surface dirt․
A crevice tool allows for precise cleaning in tight spaces, such as along edges and between furniture cushions․ The combination tool features a brush and a wide nozzle, suitable for upholstery and delicate surfaces․
Understanding the purpose of each attachment maximizes the DC17’s versatility and cleaning performance, ensuring every area of your home receives the appropriate level of attention․
Wand and Hose Functionality
The Dyson DC17’s wand and hose system significantly extends its reach and versatility, allowing you to clean areas that are difficult to access with the main body of the vacuum․ The lightweight wand easily connects to the hose and various brush heads, providing maneuverability for cleaning ceilings, curtains, and under furniture․
The hose itself is flexible and durable, designed to withstand regular use and twisting motions․ It allows for cleaning in awkward angles and reaching behind large objects․
Properly connecting and disconnecting the wand and hose is crucial for optimal suction and preventing damage․ Regularly inspect the hose for cracks or blockages to maintain peak performance․

Routine Maintenance & Cleaning
Consistent upkeep, including dustbin emptying, filter checks, and blockage removal, preserves suction power and extends the lifespan of your Dyson DC17 vacuum cleaner․
Emptying the Dustbin – Step-by-Step
Regularly emptying the dustbin is crucial for maintaining optimal suction performance with your Dyson DC17․ Begin by powering off the vacuum and disconnecting it from the power outlet․ Locate the dustbin release button – typically a red button – on the body of the machine․ Press this button to detach the dustbin․
Carefully remove the dustbin, holding it over a designated waste container to avoid scattering debris․ Open the dustbin by pressing the release clip or rotating the base, depending on your DC17 model․ Empty the collected dirt and dust completely․ For stubborn debris, gently tap the dustbin to dislodge it․
Once emptied, reassemble the dustbin securely, ensuring it clicks firmly back into place on the vacuum․ A properly sealed dustbin is essential for effective cyclone separation and consistent cleaning power․ Remember to empty the dustbin frequently, especially during intensive cleaning sessions․
Washing the Dustbin and Components
Periodically washing the dustbin and its components ensures hygienic operation and maintains peak suction․ Begin by completely emptying the dustbin as described previously․ Disassemble the dustbin, separating the main body from the cyclone assembly and any removable filters․
Wash all components – except the cyclone assembly, which should only be wiped clean – in cool water with a mild detergent․ Avoid using harsh chemicals or abrasive cleaners․ Rinse thoroughly under running water until all soap residue is removed․
Allow all parts to air dry completely – this is crucial – before reassembling․ Never reassemble with damp components, as this can damage the motor or promote mold growth․ Ensure a secure fit when reassembling, and always check for proper sealing before use․ Regular washing contributes to a cleaner, fresher home․
Filter Cleaning and Replacement Schedule
Maintaining clean filters is vital for optimal performance and air quality․ The Dyson DC17 utilizes multiple filters – pre-motor and post-motor – each requiring different maintenance․ Wash the pre-motor filter every month with cool water; allow it to dry completely (at least 24 hours) before reinstalling․
The post-motor filter, typically a HEPA filter, should be checked quarterly․ If visibly dirty, gently tap it to remove loose dust․ Replacement is recommended every year, or more frequently in homes with pets or allergy sufferers․
Ignoring filter maintenance significantly reduces suction and can strain the motor․ Regularly inspect filters for damage; torn or compromised filters must be replaced immediately․ A consistent cleaning and replacement schedule ensures efficient cleaning and prolongs your Dyson’s lifespan․
Checking for Blockages – Common Locations
Loss of suction often indicates a blockage․ Begin by disconnecting the wand and hose․ Inspect the hose for obstructions – larger items often accumulate here․ Next, examine the wand; a flexible brush or long object can dislodge trapped debris․
The brush head is another frequent culprit․ Remove the brush bar and clear any tangled hair, string, or fibers․ Check the airway leading from the brush head to the main body․ Finally, inspect the dustbin inlet and cyclone assembly for clogs․
Regularly checking these areas prevents performance decline․ A thorough inspection after each use, especially with pet hair or significant dust, will maintain optimal suction power and extend the life of your Dyson DC17․
Troubleshooting Common Issues
This section provides solutions for typical Dyson DC17 problems, including suction loss, overheating, brush head malfunctions, and motor concerns, ensuring continued usability․
Loss of Suction – Diagnosis & Fixes
Reduced suction power is a common issue with the Dyson DC17, often stemming from several easily addressable causes․ First, always check the dustbin; a full bin drastically limits airflow․ Ensure it’s emptied and properly reseated․ Next, meticulously inspect the hose and wand for blockages – use a long, flexible tool to dislodge any debris․
The filters are crucial; a clogged filter severely restricts suction․ Remove and wash the filters (following the cleaning instructions in the ‘Routine Maintenance’ section) or replace them if damaged․ Finally, examine the brush head for tangled hair or fibers․ Removing these obstructions will restore optimal airflow․ If the problem persists after these steps, a more thorough inspection of the cyclone assembly might be necessary, potentially indicating a deeper blockage requiring professional attention․
Overheating Problems and Solutions
If your Dyson DC17 is overheating, immediately power off the unit to prevent potential damage․ Overheating typically indicates restricted airflow, forcing the motor to work harder․ The most frequent culprit is a blocked filter system – thoroughly clean or replace the filters as outlined in the ‘Routine Maintenance’ section․
A clogged hose, wand, or brush head also contributes significantly to overheating․ Carefully inspect and remove any obstructions․ Ensure the dustbin isn’t overfilled, as this restricts airflow․ Avoid using the Dyson DC17 for extended periods without breaks, allowing the motor to cool down․ If overheating continues despite these measures, a fault within the motor itself may be present, requiring professional diagnosis and potential repair or replacement․
Brush Head Not Spinning – Causes & Repair
A non-spinning brush head on your Dyson DC17 usually points to an obstruction or a mechanical fault․ First, power off the machine and disconnect it from the power source․ Thoroughly inspect the brush head for tangled hair, threads, or debris wrapped around the brush bar․ Remove these obstructions carefully;
Next, check the brush head’s motor connection – ensure it’s securely attached․ A blown belt is a common issue; if the belt is broken or stretched, it requires replacement․ If the belt appears intact, the brush head motor itself may be faulty, necessitating professional repair or replacement․ Always refer to the ‘Advanced Maintenance’ section for guidance on component replacement, and prioritize safety during any disassembly or repair attempts․
Motor Issues – Identifying and Addressing
Diagnosing motor problems in your Dyson DC17 requires careful observation․ Listen for unusual noises – whining, grinding, or complete silence – during operation․ Reduced suction power, even after checking for blockages, often indicates a motor issue․ A burning smell is a critical warning sign; immediately power off and unplug the machine․
Attempting motor repair is complex and potentially dangerous; caution is strongly advised․ Check the motor’s wiring for loose connections or damage․ If the motor consistently overheats or fails to start, replacement is typically the most practical solution․ Refer to the ‘Advanced Maintenance’ section for detailed instructions, but consider professional assistance for this repair due to the inherent risks involved with electrical components․

Advanced Maintenance & Repairs
This section details complex repairs like motor and cyclone assembly replacement, requiring technical skill and caution for optimal Dyson DC17 functionality․
Replacing the Motor (Caution Advised)
Replacing the Dyson DC17 motor is an advanced repair best left to qualified technicians due to the complexities involved and potential safety hazards․ Disconnecting the power supply is paramount before commencing any work․ Carefully disassemble the machine, noting the wiring configuration for accurate reassembly․
The motor is typically secured with several screws and connectors; document their locations․ Once removed, inspect the new motor for any shipping damage․ Align the new motor precisely with the mounting points and reconnect all wiring harnesses, ensuring secure connections․
Caution: Incorrect wiring can cause permanent damage to the machine or pose an electrical shock risk․ After reassembly, test the motor’s functionality before fully reassembling the Dyson DC17․ If unsure, seek professional assistance․
Replacing the Cyclone Assembly
The Dyson DC17’s cyclone assembly is crucial for its powerful suction; replacement requires careful attention to detail․ Begin by disconnecting the machine from the power source․ Disassemble the upper body of the Dyson, carefully noting the position of each component as you remove them․ The cyclone assembly is typically held in place by several clips and screws․
Once detached, inspect the new cyclone assembly for any defects․ Ensure all seals and gaskets are correctly positioned before installation․ Align the new assembly precisely within the housing and secure it with the clips and screws, tightening them firmly but avoiding over-tightening․
Important: Proper alignment is vital for optimal airflow and suction․ After reassembly, test the Dyson DC17 to confirm the cyclone is functioning correctly and suction is restored․
Hose and Wand Repair/Replacement
Maintaining a clear airway through the hose and wand is essential for consistent suction in your Dyson DC17․ Begin by disconnecting the hose and wand from both the main body and any attached tools․ Inspect the hose for cracks, holes, or blockages; even small damages can significantly reduce performance․
For minor cracks, specialized repair tape can offer a temporary fix, but complete replacement is often recommended․ When replacing, ensure the new hose or wand is compatible with your DC17 model․ Securely attach the new components, verifying a tight seal at all connection points․
Caution: Always check for complete blockage removal before reattaching․ A partially blocked hose or wand will strain the motor and reduce cleaning efficiency․
Safety Precautions & Warnings
Prioritize electrical safety, proper usage, and careful storage to prevent damage to your Dyson DC17 and ensure safe, effective cleaning experiences always․
Electrical Safety Guidelines
Always ensure the Dyson DC17 is connected to a properly grounded electrical outlet, matching the voltage specified on the machine’s rating plate․ Never use extension cords unless absolutely necessary, and if used, ensure they are heavy-duty and rated for the appliance’s power consumption․
Inspect the power cord regularly for any signs of damage – cracks, fraying, or exposed wires – and immediately discontinue use if damage is detected․ Do not operate the vacuum with a damaged cord or plug, and contact Dyson customer support for repair or replacement․
Avoid using the DC17 in wet or damp locations, and never immerse the machine, cord, or plug in water or other liquids․ Unplug the vacuum from the outlet before performing any maintenance or troubleshooting․ Do not attempt to disassemble or repair the electrical components yourself; this should only be done by qualified personnel․ Keep the cord away from heated surfaces and sharp edges․
Proper Usage to Avoid Damage
To prolong the life of your Dyson DC17, avoid vacuuming hard or sharp objects that could damage the brush heads or internal components․ Do not use the vacuum to pick up flammable liquids, gases, or hazardous materials․ Always empty the dustbin when it reaches the ‘max’ line to maintain optimal suction and prevent motor strain․
Avoid forcefully pushing the vacuum against furniture or walls, as this can cause damage to both the machine and your surroundings․ Regularly check the brush heads for tangled hair or debris, and remove it promptly․
Do not operate the DC17 without all filters properly in place, as this can lead to motor overheating and reduced performance․ Ensure the wand and hose are securely connected before use, and avoid bending or kinking them excessively․ Follow the recommended maintenance schedule to keep your Dyson DC17 running smoothly․
Storage and Transportation Recommendations
When storing your Dyson DC17, choose a cool, dry location away from direct sunlight and extreme temperatures․ Ensure the dustbin is empty and all components are clean before long-term storage to prevent odors and potential damage․ Avoid storing the vacuum in damp environments, as this can lead to corrosion․
For transportation, secure the Dyson DC17 to prevent it from shifting or tipping over during transit․ Disconnect all attachments and store them separately to avoid scratching or breakage․
If transporting in a vehicle, consider using the original packaging or a padded bag for added protection․ Avoid placing heavy objects on top of the vacuum during transport․ Regularly inspect the machine for any signs of damage after transportation, and address any issues promptly to maintain optimal performance and longevity․